- FrUITeR’s paper

- FrUITeR’s trailer video
- FrUITeR’s long video
- FrUITeR’s Reddit post (feel free to comment! :))
Table of Content
- FrUITeR’s Introduction
- Installation
- Quick Start
- Fully Reproduce and Reuse
- FrUITeR’s Final Datasets
- Guidance for New Techniques
FrUITeR’s Introduction
This document describes the artifacts associated with the paper FrUITeR – A Framework for Evaluating UI Test Reuse that has been accepted to ESEC/FSE 2020.
Paper Authors: Yixue Zhao, Justin Chen, Adriana Sejfia, Marcelo Schmitt Laser, Jie Zhang, Federica Sarro, Mark Harman, and Nenad Medvidovic.
Paper Abstract: UI testing is tedious and time-consuming due to the manual effort required. Recent research has explored opportunities for reusing existing UI tests for an app to automatically generate new tests for other apps. However, the evaluation of such techniques currently remains manual, unscalable, and unreproducible, which can waste effort and impede progress in this emerging area. We introduce FrUITeR, a framework that automatically evaluates UI test reuse in a reproducible way. We apply FrUITeR to existing test-reuse techniques on a uniform benchmark we established, resulting in all test reuse cases from 20 apps. We report several key findings aimed at improving UI test reuse that are missed by existing work.
FrUITeR’s Workflow: As shown in the figure below, FrUITeR takes inputs from Existing Tests and Existing Techniques (left), and outputs the evaluation Results of given existing techniques in the end (right). The details of the workflow are described in Section 4.2 in the paper.
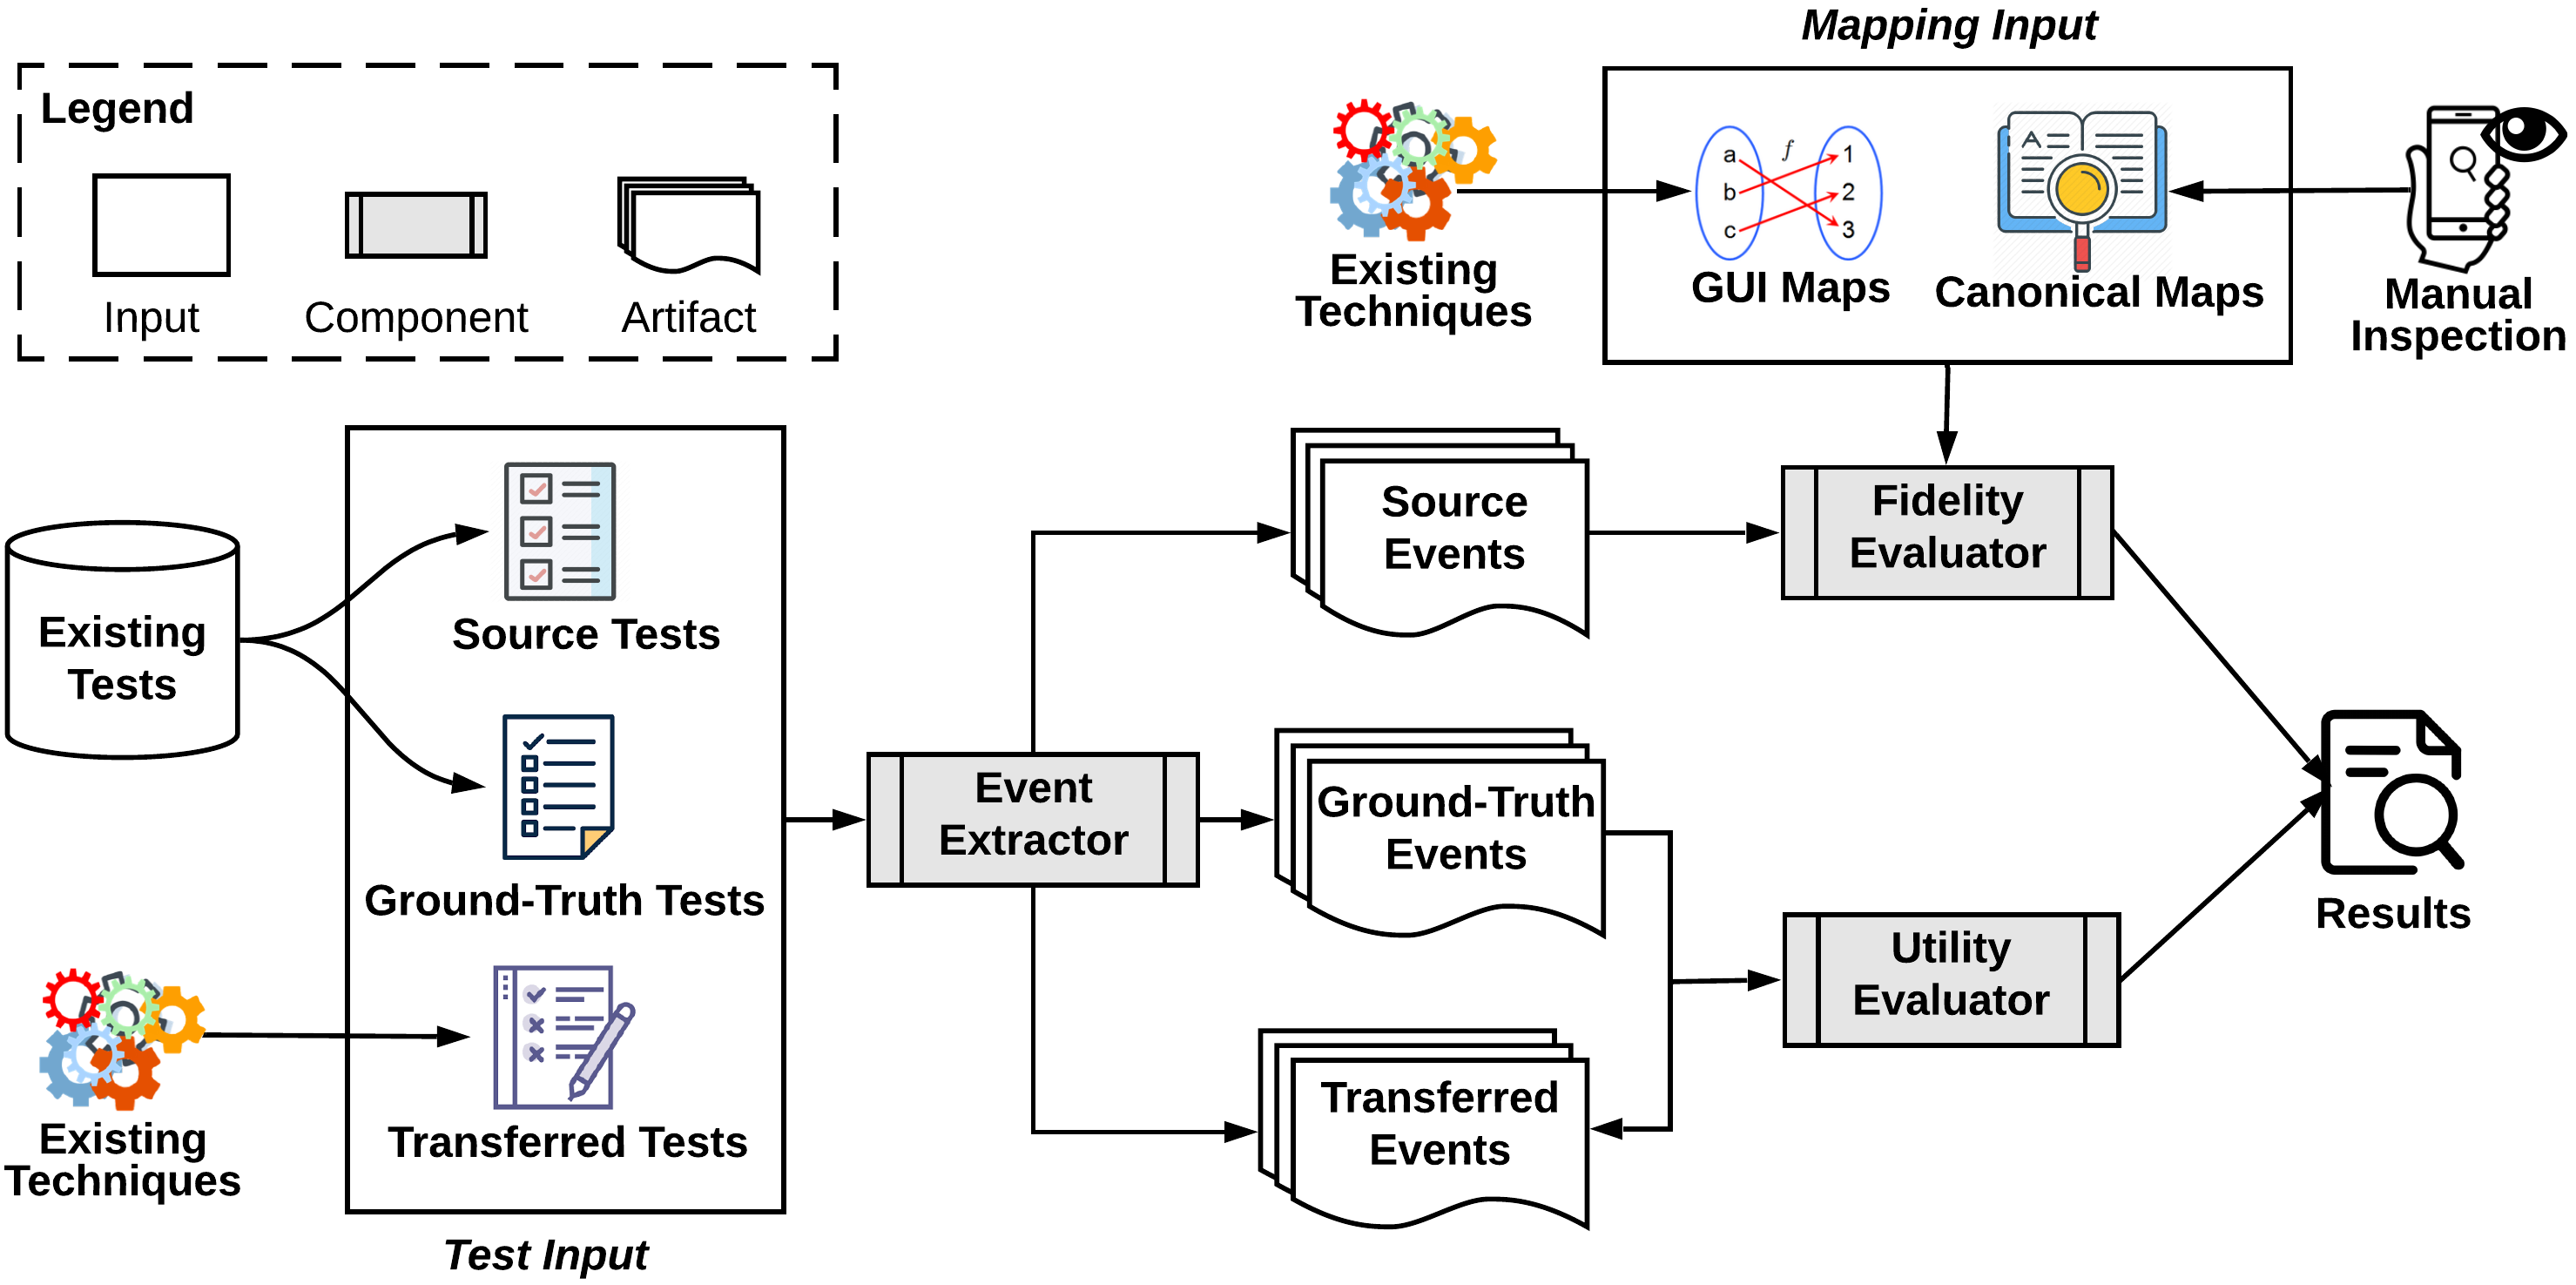
Source Tests: the test cases that need to be transferred.
Ground-Truth Tests: the manually constructed test cases that represent the ground truths for the transferred test cases.
Transferred Tests: the test cases transferred by a given test reuse technique (i.e., what we want to evaluate).
Event Extractor: FrUITeR’s component that converts the test cases to a uniform format of event sequences, so that the heterogeneous test cases can be evaluated in the same way.
Fidelity Evaluator: FrUITeR’s component that evaluates the mapping of the GUI events from the source app to the target app, based on FrUITeR’s 7 fidelity metrics (recall Section 4.1.1 and Table 1 in the paper): (1) Correct; (2) Incorrect; (3) NonExist; (4) Missed; (5) Accuracy; (6) Precision; and (7) Recall.
GUI Maps: the input for Fidelity Evaluator that contains the mapping of the GUI events from the source app to the target app generated by a given existing technique.
Canonical Maps: the input for Fidelity Evaluator that contains the manually constructed ground truths for the mapping of the GUI events from the source app to the target app.
Utility Evaluator: FrUITeR’s component that evaluates the usefulness of test cases transferred by a given technique compared to the ground-truth test cases, based on FrUITeR’s 2 utility metrics (recall Section 4.1.2 in the paper): (1) Effort; and (2) Reduction.
Installation
-
Download and install Docker Desktop. [Link]
-
Start your Docker Desktop application and go to your favorite terminal. Test that your installation works by running the hello-world Docker image using command
$ docker run hello-world. If you see the message below, Docker is successfully installed!Unable to find image 'hello-world:latest' locally latest: Pulling from library/hello-world ca4f61b1923c: Pull complete Digest: sha256:ca0eeb6fb05351dfc8759c20733c91def84cb8007aa89a5bf606bc8b315b9fc7 Status: Downloaded newer image for hello-world:latest Hello from Docker! This message shows that your installation appears to be working correctly. ...
That’s it! You’re done with all the installation and ready to go! :D
Quick Start
FrUITeR has three components (shaded boxes in the workflow): (1) Event Extractor; (2) Fidelity Evaluator; and (3) Utility Evaluator. In the Quick Start section, we will run each of them with simple examples.
Event Extractor
Source Code Location: https://github.com/felicitia/EventExtractor
Event Extractor is implemented in Java using Soot framework. We have created a Docker image with all the dependencies. Simply follow the steps below to run Event Extractor.
What to Expect: Let’s use the app Wish as an example. Event Extractor will extract the GUI event sequences from Wish’s test cases to Wish.csv. We assume the test cases are already written. For example, Wish’s test cases are located on our Github repository: Wish’s test cases.
Steps
-
The Docker image of the Event Extractor is located on Docker Hub [Link]. In your favorite terminal, simply run the CMD below to download the Docker image to your local machine. (Make sure your Docker Desktop application is running.)
CMD:
$ docker pull felicitia/fruiter-eventextractor -
We recommend creating a clean new directory for the output files produced by Event Extractor so that you can find them easily. For example, create a ‘shared_volume’ folder using the CMD below.
CMD:
$ mkdir shared_volume -
Run Event Extractor to convert Wish’s test cases into
Wish.csvusing the CMD below. You only need to replace{ABSOLUTE_PATH}, which is the full absolute path to the directory that contains the ‘shared_volume’ folder you just created in step 2. You can simply use$ pwdcommand to get the absolute path of the current directory. If you want to know more about the Docker parameters, check out this reference.CMD:
$ docker run -dit -P -v {ABSOLUTE_PATH}/shared_volume:/output/ felicitia/fruiter-eventextractor Wish.RepresentativeTests classes/ /output/ -
You should see
Wish.csvin the ‘shared_volume’ folder you created in step 2. You can compare yours with our example Wish.csv to check the correctness.
If your Wish.csv looks the same as ours, congratulations! You have successfully run FrUITeR’s Event Extractor!
Fidelity Evaluator and Utility Evaluator
Source Code Location: https://github.com/felicitia/TestAnalyzer
Fidelity Evaluator and Utility Evaluator are implemented in Python using Jupyter Notebook. They belong to the TestAnalyzer repository. We envision Fidelity Evaluator and Utility Evaluator are two instances of TestAnalyzer’s Evaluators based on the fidelity and utility metrics we defined. In the future, TestAnalyzer can be extended to include other Evaluators based on the metrics of one’s interest (defined by us or other follow-up work).
We have created a Docker image with all the dependencies for you to launch Jupyter Notebook (no need to download Jupyter Notebook separately). Simply follow the steps below to run Fidelity Evaluator and Utility Evaluator.
What to Expect: Let’s reproduce CraftDroid’s 12 cases as an example (the 12 cases are described in Section 5.3.2 in the paper). Both Fidelity Evaluator and Utility Evaluator will output the final results of the 7 fidelity metrics and 2 utility metrics as .csv files, based on the necessary inputs indicated in the workflow diagram.
Steps
-
The Docker image of the TestAnalyzer (contains both Fidelity Evaluator and Utility Evaluator) is located on Docker Hub [Link]. In your favorite terminal, simply run the CMD below to download the image to your local machine. (Make sure your Docker Desktop application is running.)
CMD:
$ docker pull felicitia/fruiter-testanalyzer -
Run TestAnalyzer to launch the Jupyter Notebook server using the CMD below.
CMD:
$ docker run -p 8888:8888 felicitia/fruiter-testanalyzerYou should see the following messages.
[I 02:44:42.811 NotebookApp] Writing notebook server cookie secret to /root/.local/share/jupyter/runtime/notebook_cookie_secret [I 02:44:43.154 NotebookApp] Serving notebooks from local directory: /src [I 02:44:43.154 NotebookApp] The Jupyter Notebook is running at: [I 02:44:43.154 NotebookApp] http://b2ff46ae4b61:8888/?token=51aa6c478ed99cedcc04a22262c56d89952f4345bfd6f6ee [I 02:44:43.154 NotebookApp] or http://127.0.0.1:8888/?token=51aa6c478ed99cedcc04a22262c56d89952f4345bfd6f6ee [I 02:44:43.154 NotebookApp] Use Control-C to stop this server and shut down all kernels (twice to skip confirmation). [C 02:44:43.158 NotebookApp] To access the notebook, open this file in a browser: file:///root/.local/share/jupyter/runtime/nbserver-6-open.html Or copy and paste one of these URLs: http://b2ff46ae4b61:8888/?token=51aa6c478ed99cedcc04a22262c56d89952f4345bfd6f6ee or http://127.0.0.1:8888/?token=51aa6c478ed99cedcc04a22262c56d89952f4345bfd6f6ee -
Copy the URL in the last line shown in step 2. In our example above, it is
http://127.0.0.1:8888/?token=51aa6c478ed99cedcc04a22262c56d89952f4345bfd6f6ee. Open the URL in a browser. You should see a similar screen as below. (Make sure you don’t have other Jupyter Notebook servers running already. You can use$ jupyter notebook listcommand as a sanity check.)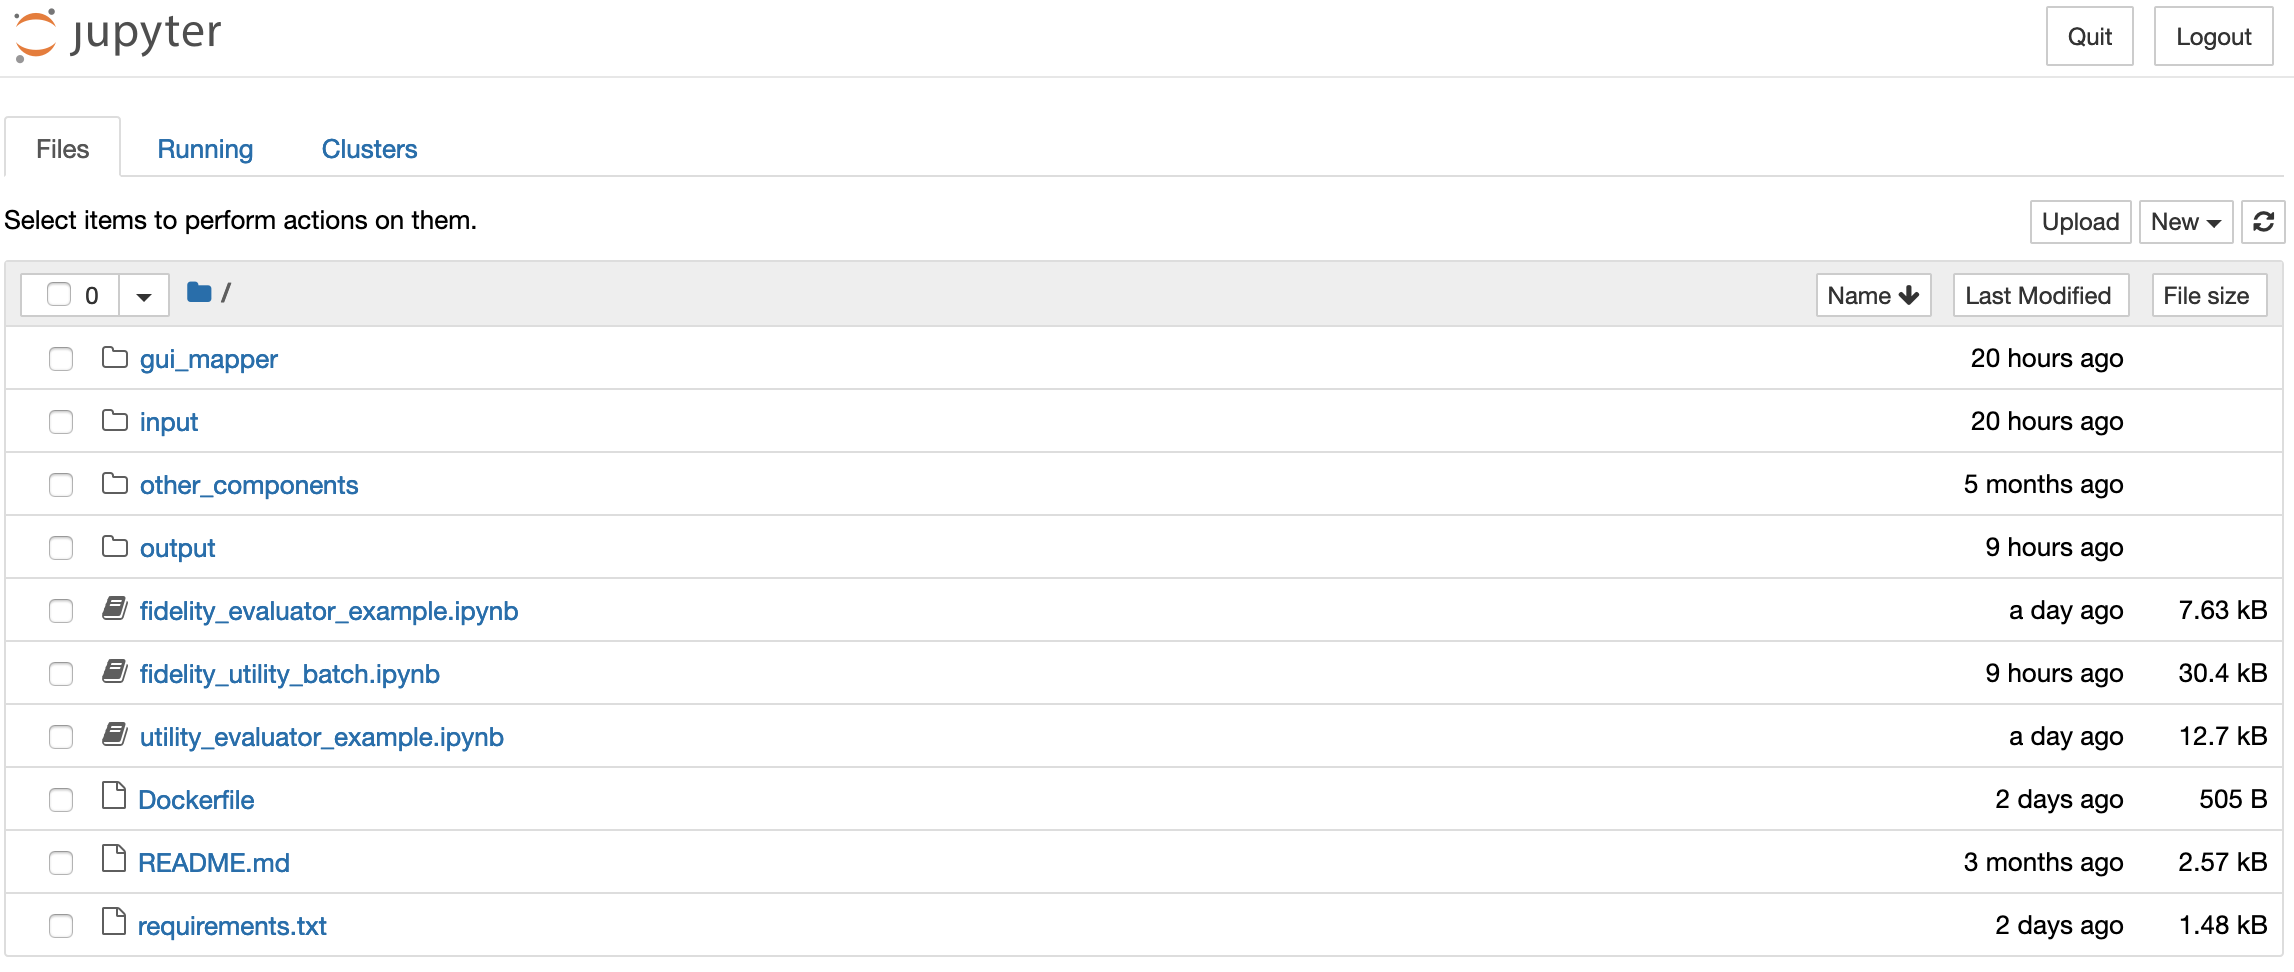
-
Go to
fidelity_evaluator_example.ipynband run it by clicking the ‘Run’ button as shown below. It will outputcraftdroid_fidelity.csvin theoutput/folder located in the home page (as indicated in the screenshot above). The output files can be downloaded to your local machine (download option is under the ‘File’ menu). You can compare your output with our example craftdroid_fidelity.csv to check the correctness. Note that the order of the rows may be different depending on your local machine.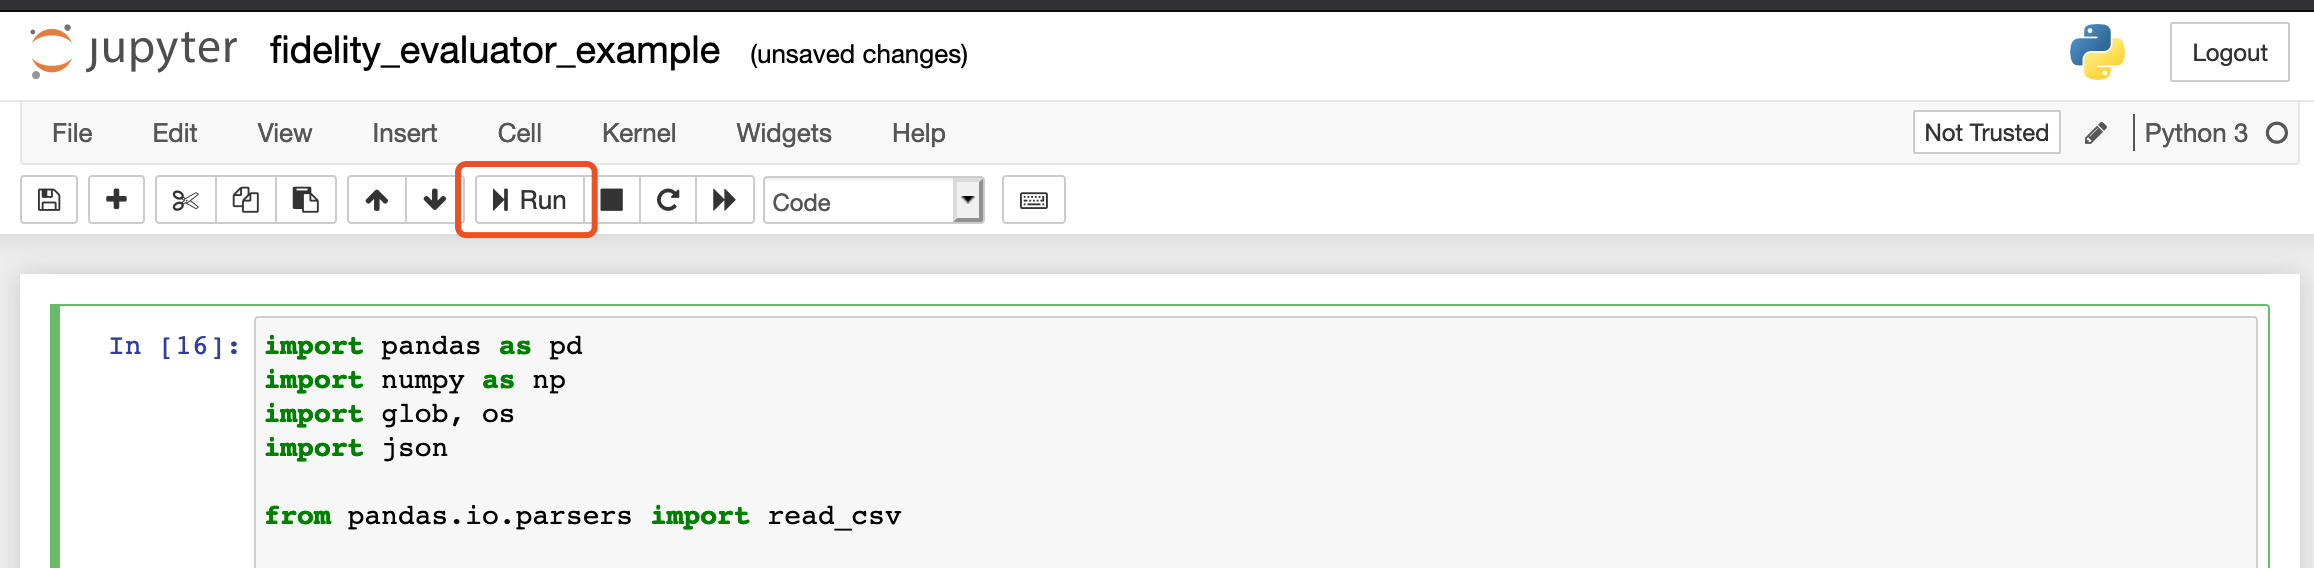
-
Similar to step 4, go to
utility_evaluator_example.ipynband run it by clicking the ‘Run’ button. It will outputcraftdroid_utility.csvin theoutput/folder located in the home page. You can compare your output with our example craftdroid_utility.csv to check the correctness. Note that the order of the rows may be different depending on your local machine.
If your craftdroid_fidelity.csv and craftdroid_utility.csv look the same as ours, congratulations! You have successfully run FrUITeR’s Fidelity Evaluator and Utility Evaluator! You can now proceed to fully reproduce the results of all the test reuse cases from the 20 subject apps following the instructions below.
Fully Reproduce and Reuse
This section describes how to fully reproduce all the experiments (i.e., output the results of all the test reuse cases) studied in our ESEC/FSE 2020 paper. We will also explain how to reuse FrUITeR to run your own experiments.
Event Extractor
Fully Reproduce Event Extractor
The Quick Start showed how to run Event Extractor using the app Wish as an example. Similarly, to fully reproduce Event Extractor with all the 20 subject apps, you can follow the same steps and simply replace the parameter Wish.RepresentativeTests in step 3 to another app {APP_NAME}.RepresentativeTests, such as Etsy.RepresentativeTests and abc.RepresentativeTests. The details of the 20 apps and their corresponding test cases are described in Table 2 and Table 3 in the paper.
The {APP_NAME} of our 20 subject apps can be found in Event Extractor’s repository [Link]. The corresponding *.apk files of the 20 apps can be downloaded here. You can compare your results of the 20 apps with ours here.
Reuse Event Extractor
If you wish to reuse FrUITeR’s Event Extractor to extract the GUI event sequences from the test cases of your own choice, follow the steps below. Note that the current implementation of the Event Extractor is based on Soot framework, which only supports Java test cases.
Steps
-
Clone the Event Extractor repository from Github [Link].
-
Obtain the
.classfiles of your Java test cases. These.classfiles serve as the input to Event Extractor.If you have already written your Java test cases and compiled them, great! You will already have the
.classfiles.If you wish to write new Java test cases from scratch, you can reuse our TestBenchmark-Java-client project by simply extending it. This is a Maven project and the current test cases are written with Appium framework. You can follow the same structure by adding test cases to
src/main/java/{APP_NAME}/{TEST_NAME}and adding the subject app’s.apkfile tosubjects/{APP_CATEGORY}. If your test cases are compiled successfully, the.classfiles will be generated, usually in/target/classes/*. -
Copy
.classfiles to Event Extractor project you cloned in step 1, undersrc/main/jib/classes/*.
Final Remarks: With your own .class files, you can run the Event Extractor on your own test cases now! Simply run the main() method in src/main/java/EventExtractor and specify the parameters (details of the parameters are explained as comments in the src/main/java/EventExtractor.java). If you also want to build a Docker image out of your own Event Extractor like FrUITeR, follow this instruction to containerize your Maven project using Jib.
Fidelity Evaluator and Utility Evaluator
Fully Reproduce Fidelity Evaluator and Utility Evaluator
Friendly Reminder: The experiments are executed in batch to produce the final results of all the test reuse cases (both fidelity and utility), based on the .csv files of the 20 apps produced after fully reproducing the Event Extractor. This batch process will take some time. The runtime may vary depending on the configuration of your local machine. In our experiment, each experiment took less than an hour. Our configuration is the following.
MacBook Pro (13-inch, 2019, Four Thunderbolt 3 ports)
Processor: 2.8 GHz Quad-Core Intel Core i7
Memory: 16 GB 2133 MHz LPDDR3
What to Expect: If successful, you will get shopping_final.csv that contains the results of the shopping apps, and news_final.csv that contains the results of the news apps.
Steps
-
Repeat the first 3 steps described in the Quick Start to launch the Jupyter Notebook and go to
fidelity_utility_batch.ipynb. -
Run the first cell to load all the functions. No output is expected.
-
Run the second cell to output intermediate results for the 10 news apps. This step takes time.
Expected Output:
Done 1/6 processing steps... Done 2/6 processing steps... Done 3/6 processing steps... Done 4/6 processing steps... Done 5/6 processing steps... Done 6/6 processing steps! :) Now writing intermediate results to framework_results_news.csv... All done! :D -
Run the third cell to output intermediate results for the 10 shopping apps. This step takes time.
Expected Output:
Done 1/6 processing steps... Done 2/6 processing steps... Done 3/6 processing steps... Done 4/6 processing steps... Done 5/6 processing steps... Done 6/6 processing steps! :) Now writing intermediate results to framework_results_shopping.csv... All done! :D -
Run the last cell to output final results. This step takes time. After you’re done, you can find the final results in
/output/news_final.csvand/output/shopping_final.csv, along with some intermediate results. You can compare your results with ours to check the correctness. Note that the order of the rows may be different depending on your local machine.Expected Output:
 Done 1/5 processing steps...
 Done 2/5 processing steps...
 Done 3/5 processing steps...
 Done 4/5 processing steps... Now writing news_final.csv to output folder
 Done 5/5 processing steps! :) Now writing shopping_final.csv to output folder
 All done! :D
Reuse Fidelity Evaluator and Utility Evaluator
If you wish to reuse FrUITeR’s Fidelity Evaluator and Utility Evaluator to analyze the test reuse cases of your own choice, or add your own Evaluator to calculate other metrics of interest, follow the steps below.
Steps
-
Clone the TestAnalyzer repository (contains both Fidelity Evaluator and Utility Evaluator) from Github [Link].
-
Replace the
/inputfolder with your own GUI Maps (GUI Map’s definition is in Section 4.2 in the paper). Optionally, you can reuse/modify/extend the ground-truths specified in/gui_mapper/ground_truth_mappingfolder to obtain the results based on your own ground truths. -
If your GUI Maps and ground truths follow the same format as ours, you can run the Fidelity Evaluator and Utility Evaluator in the same way (that you already did!) to get the final results. Otherwise, modify our Fidelity Evaluator and Utility Evaluator or add your own Evaluators to evaluate other interesting metrics of your own choice!
Final Remarks: If you also want to build a Docker image out of your own Evaluators like FrUITeR, follow this instruction to containerize your own Jupyter Notebook project.
FrUITeR’s Final Datasets
The results reported in the paper are based on the final datasets [Datasets.zip]. They are processed by the R scripts included in Datasets.zip based on the news_final.csv and shopping_final.csv after fully reproducing the Fidelity Evaluator and Utility Evaluator. The details of the final datasets are described in Section 5.3.2 in the paper.
Datasets.zip Content: The final datasets are stored as final_dataset.RData. The R scripts used to process and analyze the final datasets are located in /scripts. If you are unable to view .RData file, the same final datasets are exported as two .csv files.
final_2381.csvcontains the data of the 2,381 casesfinal_12.csvcontains the data of the 12 cases
Header Description
The meaning of the headers in the final datasets are explained in the table below.
| Header Name | Description |
|---|---|
source |
source app |
target |
target app |
method |
test case being transferred |
gui_mapper |
the GUI Mapper used to transfer the test |
src_events |
source events in the source test |
trans_events |
transferred events in the transferred test |
gt_events |
ground-truth events in the ground-truth test |
num_src |
the number of source events |
num_trans |
the number of transferred events |
num_gt |
the number of ground-truth events |
correct |
the set of correct events |
incorrect |
the set of incorrect events |
missed |
the set of missed events |
nonExist |
the set of nonExist events |
num_correct |
the number of the correct events |
num_incorrect |
the number of the incorrect events |
num_missed |
the number of the missed events |
num_nonExist |
the number of the nonExist events |
percent_correct |
FrUITeR’s fidelity metric: the percentage of the correct events |
percent_incorrect |
FrUITeR’s fidelity metric: the percentage of the incorrect events |
percent_missed |
FrUITeR’s fidelity metric: the percentage of the missed events |
percent_nonExist |
FrUITeR’s fidelity metric: the percentage of the nonExist events |
accuracy_precision |
FrUITeR’s fidelity metric: the value of the precision |
accuracy_recall |
FrUITeR’s fidelity metric: the value of the recall |
accuracy |
FrUITeR’s fidelity metric: the value of the accuracy |
distance |
FrUITeR’s utility metric: effort needed to correct the transferred test |
reduction |
FrUITeR’s utility metric: manual effort reduction compared to writing the test from scratch |
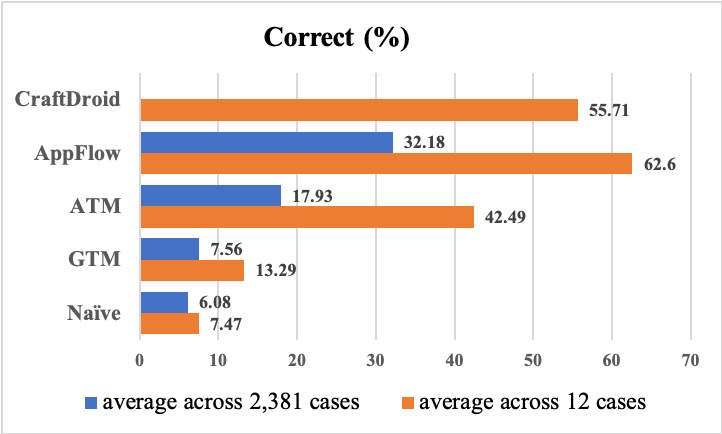
Results
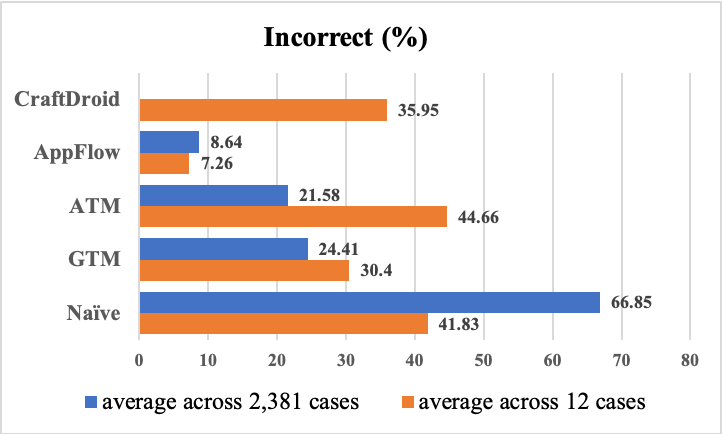
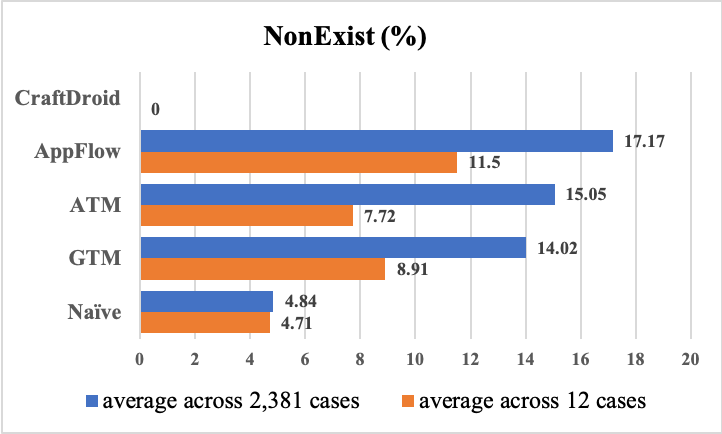
Our paper describes FrUITeR’s 7 fidelity metrics and 2 utility metrics. Due to space limitations, we show the results of 3 fidelity metrics and 2 utility metrics in the paper. The rest of the results can be found below.

Guidance for New Techniques
As explained in the paper, certain information needs to be provided to enable FrUITeR’s automated workflow discussed in Section 4.2. Specifically, the needed information is as follows.
- the Source Tests that are supplied as inputs to a given test-reuse technique
- the Transferred Tests and GUI Maps, which are produced as outputs of a given test-reuse technique
- the manually constructed ground truths, namely, Canonical Maps and Ground-Truth Tests
Since existing test-reuse techniques were proposed before FrUITeR and were not designed with FrUITeR’s workflow in mind, we had to modify existing techniques to obtain such information. This step will not be necessary for new techniques if following our guidance. This section describes the steps needed to use FrUITeR to evaluate a new test-reuse technique. Let’s get started! :)
Prerequisite
We assume you have already followed our Installation and Quick Start. If not, please follow those steps first to get your Docker environment ready!
Steps
You’ll need to provide several artifacts produced by your fancy technique, following the format that FrUITeR supports. Then you can run FrUITeR as you did in the Quick Start to get the fidelity and utility results of your technique automatically. The specific steps are provided below.
-
Extract the GUI events from your Source Tests. The extracted events should follow the format below as a
.csvfile. If your tests are written in Java using Appium, you can reuse FrUITeR’s Event Extractor.method event_array <App1.ClassName_of_Tests: void testName()> [ {GUI_Event1}, {GUI_Event2} ] event_array column contains a JSON array of GUI Events that belong to a certain test specified in the method column. Each GUI Event is a JSON object with the following fields.
{
  "input": "XXX", //the input value associated with the event (if any)
  "id_or_xpath": "XXX", //the resource id (starting with "id@") or xpath (starting with "xpath@")
  "action": "XXX" //the action of the event, e.g., "sendKeys", "click"
}
Example: Source Tests of Etsy can be found here. In this case, your extracted GUI events will look like this file etsy.csv.
-
Use your technique to generate the mapping results (i.e., Transferred Tests produced by your technique) following FrUITeR’s format (same format as the
.csvfile from step 1). But note that event_array contains the GUI events of the Transferred Tests, while in step 1 it contains the GUI events of the Source Tests.Optionally, if you want to separate the results of oracle events from the regular events, you can generate the mapping results of the oracle events following the same workflow to obtain their fidelity and utility results separately. Alternatively, you can include additional fields in the GUI Event object to capture the event type (e.g., oracle events) and extend FrUITeR’s Fidelity Evaluator and Utility Evaluator to separate the results of different types of events.
Example: The mapping results of transferring Etsy’s sign-in and sign-up tests to Wish’s may look like this file etsy_wish.csv. Note that we added a field
scoreto the GUI Event object that captures the raw similarity score. You can add a fieldevent_typeto capture oracle events as mentioned above, or other fileds of interest. -
Manually construct Canonical Maps for each of your subject app. You can reuse, modify, or extend FrUITeR’s Canonical Maps if using the same subject apps.
Example: Etsy’s Canonical Map may look like this file GT_etsy.csv. The required fields are (1) at least one of
idandxpathfields has to be specified; (2)canonicalthat shows the Canonical Event that the app-specific event maps to; (3) only if you are using our Naive baseline,current Activityandnext Activityneed to be specified. If the next Activity is the same as the current Activity, you can leave it empty. -
Extract the GUI events from your Ground-Truth Tests. This is essentially the same step as step 1 and you can reuse step 1’s artifacts. For example, the extracted GUI events of Etsy will be Source Events if Etsy is the source app, and will be the Ground-Truth Events is Etsy is the target app.
-
Extract the UI layout dumps, i.e.,
.uixfiles in XML format dumped by Android’s UIAutomator. This is used to identify the same event if it’s specified in different ways (i.e., either id or xpath). For example, if an eventEvent1in the Transfered Test usesxpathbut the Canonical Map usesidto specifyEvent1, we will not be able to find the Canonical Event ofEvent1directly. In this case, FrUITeR analyzes the UI layout dumps (i.e., the.uixfiles) to identify the XML element ofEvent1based on its xpath. With the information in the identified XML element, FrUITeR will be able to find theid(specified inresource-idfield) ofEvent1and will be able to find its Canonical Event accordingly based on thatid.Example: Some examples of Etsy’s UI layout dumps can be found in this folder. The screenshot
.pngfiles are not necessary, but just to give an intuitive understanding of what each UI layout dump is.Congratulations! 👏 Now you have prepared all the needed inputs for FrUITeR. We assume you have already run FrUITeR successfully following the Quick Start. Now you can just replace FrUITeR’s default inputs with yours and rerun FrUITeR to get the results of your new shiny technique. Hope your new technique outperforms the state-of-the-art! 😉